Net core 热插拔实现Web站点模块化开发
2021-03-07 乐帮网
c# netcore
在Net core中我们可以使用AssemblyLoadContext来实现以前 .NET Framework 中的AppDomain 机制,注意这个在.Net core 2.x版本中是不支持的。下面我就使用AssemblyLoadContext来制作一个示例程序 ,演示一个Net Core站点程序如何从安装插件并且执行插件中的方法。在此之前我们必须安装Visual Studio 2019,示例中的.Net Core使用的是3.1。下面开始我们的代码之旅。
1、首先建立一个Net Core类库,用以协定插件实现的接口约束
我以vkt.plugin.pbase为项目名称建立完成,然后在下面添加接口IPlugin代码下如:
namespace vkt.plugin.pbase
{
    public interface IPlugin
    {
        string Name { get; }
        string Description { get; }

        string Execute();
    }
}
2、建立一个.Net Core公用类库,实现AssemblyLoadContext加载管理
这个我们新建两个类PluginKit 实现动态加载以及动态查找执行方法。PluginLoadContext 实现定制化AssemblyLoadContext,方便做一些处理,代码如下:
 public class PluginKit
    {
        static Assembly LoadPlugin(string relativePath)
        {
            // Navigate up to the solution root
            string root = Path.GetFullPath(Path.Combine(
                Path.GetDirectoryName(
                    Path.GetDirectoryName(
                        Path.GetDirectoryName(
                            Path.GetDirectoryName(
                                Path.GetDirectoryName(typeof(PluginKit).Assembly.Location)))))));

            string pluginLocation = Path.GetFullPath(Path.Combine(root, relativePath.Replace('\\', Path.DirectorySeparatorChar)));
            Console.WriteLine($"Loading commands from: {pluginLocation}");


            PluginLoadContext loadContext = new PluginLoadContext(pluginLocation);
            return loadContext.LoadFromAssemblyName(new AssemblyName(Path.GetFileNameWithoutExtension(pluginLocation)));
        }

        static IEnumerable<IPlugin> CreateCommands(Assembly assembly)
        {
            int count = 0;

            Type[] typeArray = assembly.GetTypes();
            foreach (Type type in typeArray)
            {
                if (typeof(IPlugin).IsAssignableFrom(type))
                {
                    var result = Activator.CreateInstance(type) as IPlugin;

                    if (result != null)
                    {
                        count++;
                        yield return result;
                    }
                }

            }

            if (count == 0)
            {
                string availableTypes = string.Join(",", assembly.GetTypes().Select(t => t.FullName));
                throw new ApplicationException(
                    $"Can't find any type which implements IPlugin in {assembly} from {assembly.Location}.\n" +
                    $"Available types: {availableTypes}");
            }
        }

        public static string DynExecute(string name, string[] pluginPaths)
        {
            Assembly pluginAssembly = LoadPlugin(pluginPaths[0]);
            var cc = CreateCommands(pluginAssembly);


            IEnumerable<IPlugin> commands = pluginPaths.SelectMany(pluginPath =>
            {
                Assembly pluginAssembly = LoadPlugin(pluginPath);
                return CreateCommands(pluginAssembly);
            }).ToList();

            IPlugin command = commands.FirstOrDefault(c => c.Name == name);
            if (command == null)
            {
                return "No such command is known.";
            }

            return command.Execute();
        }
}

 public class PluginLoadContext : AssemblyLoadContext
    {
        private AssemblyDependencyResolver _resolver;

        public PluginLoadContext(string pluginPath)
        {
            _resolver = new AssemblyDependencyResolver(pluginPath);
        }

        protected override Assembly Load(AssemblyName assemblyName)
        {
            string assemblyPath = _resolver.ResolveAssemblyToPath(assemblyName);
            if (assemblyPath != null)
            {
                return LoadFromAssemblyPath(assemblyPath);
            }
            return null;
        }

        protected override IntPtr LoadUnmanagedDll(string unmanagedDllName)
        {
            string libraryPath = _resolver.ResolveUnmanagedDllToPath(unmanagedDllName);
            if (libraryPath != null)
            {
                return LoadUnmanagedDllFromPath(libraryPath);
            }
            return IntPtr.Zero;
        }

    }
3、编写一个测试插件项目,此项目要引用vkt.plugin.pbase,并且实现里面的接口。
这里我们起名vkt.plugin.msgplugin项目,并且编写三个类,实现三个插件逻辑如下:
public class HelloCommand : IPlugin
    {
        public string Name { get => "hello"; }
        public string Description { get => "Displays hello message."; }

        public string Execute()
        {
            return "Hello !!!";
        }
    }
 public class JsonCommand : IPlugin
    {
        public string Name { get => "json"; }
        public string Description { get => "第三方依赖"; }

        public string Execute()
        {
            return JsonConvert.SerializeObject(new {id=1,name="test",lib= "JsonCommand" });
        }
    }
 public class WorkCommand : IPlugin
    {
        public string Name { get => "work"; }
        public string Description { get => "Good day!"; }

        public string Execute()
        {
            return "I am working !!!";
        }
    }
4、建立一个站点项目,直接加载并调用插件显示信息
新建一个Net Core Web Pages项目vkt.plugin.web。在首页我们调用插件如下:
  public void OnGet()
        {
            string[] path = new string[]
            {
                @"D:\Demo\vkt.plugin\vkt.plugin.msgplugin\bin\Debug\netcoreapp3.1\vkt.plugin.msgplugin.dll"
            };
            Message = PluginKit.DynExecute("json", path);
        }
在前台页面上添加Message的显示 <p>from Assembly load method:@Model.Message</p>
注意这里我使用了绝对路径"D:\Demo\vkt.plugin\vkt.plugin.msgplugin\bin\Debug\netcoreapp3.1\vkt.plugin.msgplugin.dll"。
5、修改一下项目文件,并且设置Web项目为启动项目,然后直接运行。
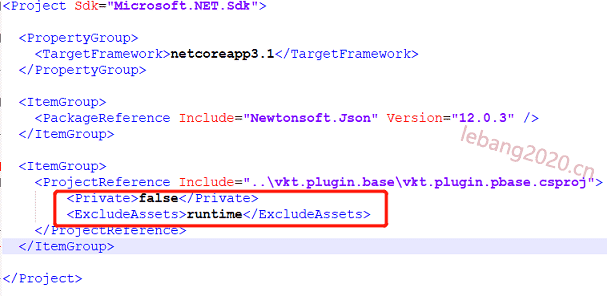
使用记事本打开vkt.plugin.msgplugin.csproj文件,编辑如下:
<ProjectReference Include="..\vkt.plugin.base\vkt.plugin.pbase.csproj">
        <Private>false</Private>
        <ExcludeAssets>runtime</ExcludeAssets>
    </ProjectReference>
下图中红框内的内容为新加。

最后运行效果如下图:

示例代码下载链接:https://pan.baidu.com/s/1PrkF0xhfUdU6ZD0X2B809Q
参考文档:https://docs.microsoft.com/zh-cn/dotnet/core/tutorials/creating-app-with-plugin-support

关注我的微信公众号
在公众号里留言交流
投稿邮箱:1052839972@qq.com
庭院深深深几许?杨柳堆烟,帘幕无重数。
玉勒雕鞍游冶处,楼高不见章台路。
雨横风狂三月暮。门掩黄昏,无计留春住。
泪眼问花花不语,乱红飞过秋千去。

如果感觉对您有帮助
欢迎向作者提供捐赠
这将是创作的最大动力
- .NET依赖注入获取多个服务实现类
- 使用命令行终止windows的进程
- 如何向微软报告反馈.Net 或者.Net Core上的Bug
- 单元测试中的 IConfiguration 怎么模拟?
- HttpClient扩展方法 PostAsJsonAsync 找不到
- C# - 如何使用HTTPClient提交数据 POST JSON数据
- C#判断当前的网络是否可用(ping)
- 使用winform程序当做asp.net core的宿主程序
- 使用ASP.NET Core 默认默认提供的 应变策略 来全局启用身份验证
- MissingMethodException: Method not found
- 请求筛选模块被配置为拒绝包含的查询字符串过长的请求
- C# byte[] string 互相转化
- NetCore 获取完整的URL
- Netcore 获取IP地址
- NLog.config 配置示例 生产环境上使用