Visual Studio 2019新建React前端和ASP.NET Core后端
2021-06-04 乐帮网
react netcore
React 于 2013 年 5 月开源,拥有较高的性能,越来越多的人已开始关注和使用它。当然在Visaul Studio 2019中也有创建模板,下面就详细介绍在Visaul Studio中搭建React的过程。当前.Net 平台下ASP.NET Core正在流行,我们可以使得React做前端 ASP.Net Core实现后端业务。下面开始新建一个项目。
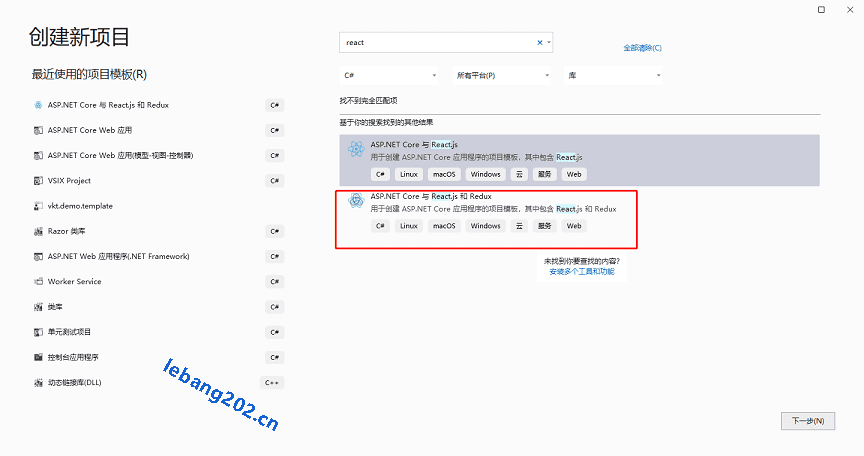
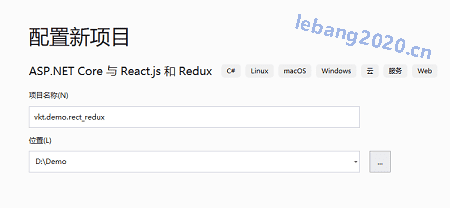
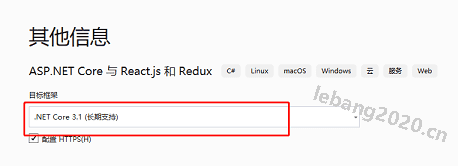
1、打开Visual Studio 2019,在搜索框里输入react,就可以找到React模板。一路下一步开始新建项目,如下图:


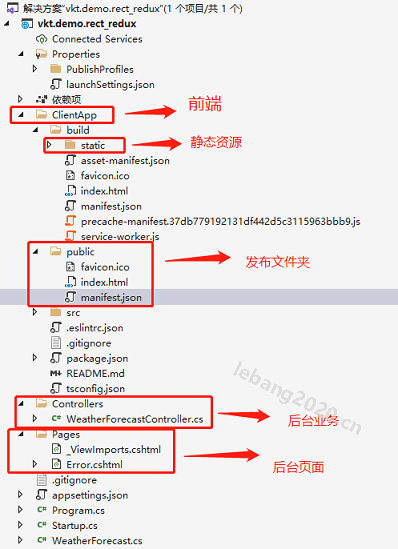
2、项目的结构
整个项目结构和我们单独开发前端的很相似,它的主要特点还是集成了ASP.Net Core的后端,仔细想一想还是很合理的。需要说明的是尽管我们新建项目时它默认生成了这一套结构,但是开发时我们可以分开,前端只需要下拉AppClient下的代码即可,完整可用,又可调试。

3、项目的发布
如果你在Visaul Studio 2019中直接点击上面的IIS Express,那么它是可以正常运行的,初次打开有点慢。这仅仅是演示,现实中我们需要发布再部署到服务器。发布过程与普通的Visaul Studio 项目无差异,直接右键项目,publish ,等等那前端呢?不用担心它已经预设好了。如果你打开它的项目文件会发现有如下的配置:所以记得哦,此类项目需要提前安装好NodeJS,但是服务器上无需,仅发布过程需要它
<Project Sdk="Microsoft.NET.Sdk.Web">

  <PropertyGroup>
    <TargetFramework>netcoreapp3.1</TargetFramework>
    <TypeScriptCompileBlocked>true</TypeScriptCompileBlocked>
    <TypeScriptToolsVersion>Latest</TypeScriptToolsVersion>
    <IsPackable>false</IsPackable>
    <SpaRoot>ClientApp\</SpaRoot>
    <DefaultItemExcludes>$(DefaultItemExcludes);$(SpaRoot)node_modules\**</DefaultItemExcludes>
  </PropertyGroup>

  <ItemGroup>
    <PackageReference Include="Microsoft.AspNetCore.SpaServices.Extensions" Version="3.1.14" />
  </ItemGroup>

  <ItemGroup>
    <!-- Don't publish the SPA source files, but do show them in the project files list -->
    <Content Remove="$(SpaRoot)**" />
    <None Remove="$(SpaRoot)**" />
    <None Include="$(SpaRoot)**" Exclude="$(SpaRoot)node_modules\**" />
  </ItemGroup>

  <Target Name="DebugEnsureNodeEnv" BeforeTargets="Build" Condition=" '$(Configuration)' == 'Debug' And !Exists('$(SpaRoot)node_modules') ">
    <!-- Ensure Node.js is installed -->
    <Exec Command="node --version" ContinueOnError="true">
      <Output TaskParameter="ExitCode" PropertyName="ErrorCode" />
    </Exec>
    <Error Condition="'$(ErrorCode)' != '0'" Text="Node.js is required to build and run this project. To continue, please install Node.js from https://nodejs.org/, and then restart your command prompt or IDE." />
    <Message Importance="high" Text="Restoring dependencies using 'npm'. This may take several minutes..." />
    <Exec WorkingDirectory="$(SpaRoot)" Command="npm install" />
  </Target>

  <Target Name="PublishRunWebpack" AfterTargets="ComputeFilesToPublish">
    <!-- As part of publishing, ensure the JS resources are freshly built in production mode -->
    <Exec WorkingDirectory="$(SpaRoot)" Command="npm install" />
    <Exec WorkingDirectory="$(SpaRoot)" Command="npm run build" />

    <!-- Include the newly-built files in the publish output -->
    <ItemGroup>
      <DistFiles Include="$(SpaRoot)build\**; $(SpaRoot)build-ssr\**" />
      <ResolvedFileToPublish Include="@(DistFiles->'%(FullPath)')" Exclude="@(ResolvedFileToPublish)">
        <RelativePath>%(DistFiles.Identity)</RelativePath>
        <CopyToPublishDirectory>PreserveNewest</CopyToPublishDirectory>
        <ExcludeFromSingleFile>true</ExcludeFromSingleFile>
      </ResolvedFileToPublish>
    </ItemGroup>
  </Target>

</Project>
4。项目的部署
发布后的目录,前端在ClientApp/build 下,或许你会感觉到奇怪这能访问到吗?别担心老兄弟,ASP.Net core早已经配置好静态目录了,所以运行的话一切OK,值得说明的是前端可以脱离Visaul Studio 发布,可以使用npm build run直接打包,完全可以。
Linux下部署:https://lebang2020.cn/details/210323w1i4tstv.html
Windows下部署:https://lebang2020.cn/details/210322njnautk1.html
体验起来和正常的项目没有什么不同。
写在最后:我感觉这是一个非常棒的结构,ASP.Net Core太灵活了,以至于可以实现这样的结构。太简单了。
原创作品禁止转载!

关注我的微信公众号
在公众号里留言交流
投稿邮箱:1052839972@qq.com
庭院深深深几许?杨柳堆烟,帘幕无重数。
玉勒雕鞍游冶处,楼高不见章台路。
雨横风狂三月暮。门掩黄昏,无计留春住。
泪眼问花花不语,乱红飞过秋千去。

如果感觉对您有帮助
欢迎向作者提供捐赠
这将是创作的最大动力
- .NET依赖注入获取多个服务实现类
- 在.Net中使用ZIP格式文件
- 使用命令行终止windows的进程
- ASP.NET Core中去除http请求的详细日志
- 如何向微软报告反馈.Net 或者.Net Core上的Bug
- .net6 添加Nlog支持
- Unhandled exception rendering component: '<' is an invalid start of a value
- .Net Core中installer与 binaries有什么区别?
- .Net Core6 必须安装VS2022
- ASP .Net 获取网卡MAC物理地址
- Ant Design和Ant Design Pro的区别
- 大量 Blazor 学习资源
- Unable to resolve service Server.Circuits.CircuitRegistry
- 单元测试中的 IConfiguration 怎么模拟?
- HttpClient扩展方法 PostAsJsonAsync 找不到